Chocolate Protein Bars
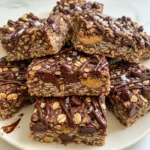
These homemade Chocolate Protein Bars are a healthy, no-bake snack perfect for busy families. They are chewy, decadent, and provide a balanced combination of complex carbohydrates, healthy fats, and high-quality protein, tasting like a rich brownie without the preservatives or excessive sugars found in commercial brands. They are versatile, cost-effective, and provide lasting energy.
- Prep Time: 15 mins
- Cook Time: 0 mins
- Total Time: 2 hours 15 mins
- Yield: 10 servings
- Category: Snack
- Method: No-Bake, Chill
- Cuisine: American
- Diet: Gluten Free, Vegan Option
Ingredients
2 Cups Old Fashioned Rolled Oats
1 Cup Chocolate Protein Powder
1/2 Cup Natural Peanut or Almond Butter
1/3 Cup Honey or Maple Syrup
1/4 Cup Unsweetened Cocoa Powder
1/4 Cup Milk (Dairy or Plant-based)
1/3 Cup Dark Chocolate Chips
1 Teaspoon Vanilla Extract
1/4 Teaspoon Sea Salt
Instructions
- Find a large mixing bowl. Combine your dry ingredients first: rolled oats, protein powder, cocoa powder, and sea salt. Use a whisk to break up any clumps in the protein powder to ensure even distribution of flavor
- Next, add the wet ingredients. Measure out your nut butter and sweetener. If your nut butter is stiff, microwave it for 20 seconds to make it pourable. Add the vanilla extract and the initial 1/4 cup of milk
- Start stirring the mixture with a sturdy spatula. At first, it might seem too dry, but keep working it. If the dough remains crumbly after a minute of mixing, add more milk one tablespoon at a time until you achieve a thick, slightly sticky dough that holds together when pressed
- Once the dough is ready, fold in your chocolate chips
- Line an 8×8 inch baking pan with parchment paper. Press the protein bar mixture firmly into the pan. Use the back of a spoon or a flat glass to smooth it out into an even layer
- Place the pan in the refrigerator for at least two hours to let the bars set completely
- Once firm, lift the parchment paper out and slice them into rectangular Chocolate Protein Bars
Notes
For best results, always use parchment paper to easily remove the bars from the pan.
Add liquid (milk, nut butter, honey/maple syrup) slowly, as different protein powders absorb liquid differently. You can always add more, but you can't take it away.
Press the mixture down as firmly as possible into the pan. This density helps the bars hold their shape.
Do not rush the chilling process. The oats need time to hydrate and the fats need time to solidify for a firm bar.
Keep your hands slightly damp when pressing the dough to prevent the sticky mixture from clinging to your fingers.
To customize for a nut allergy, swap peanut butter for sunflower seed butter.
For a vegan lifestyle, use maple syrup instead of honey and choose a high-quality pea or soy protein powder.
Experiment with add-ins like chia seeds, ground flaxseeds, chopped walnuts, or slivered almonds for extra nutrition or crunch.
Store in an airtight container in the refrigerator for up to two weeks. Cold bars have a wonderful, fudge-like texture.
For long-term storage, wrap each bar individually and freeze for up to three months. Thaw in a lunchbox or at room temperature.
For a warm treat, microwave a bar for 10 seconds; be careful not to overheat to prevent dryness.
Serve alongside coffee, fresh fruit, a glass of milk, or crumbled over Greek yogurt for a fuller meal or indulgent snack.
Find it online: https://recipeforhouse.com/chocolate-protein-bars/